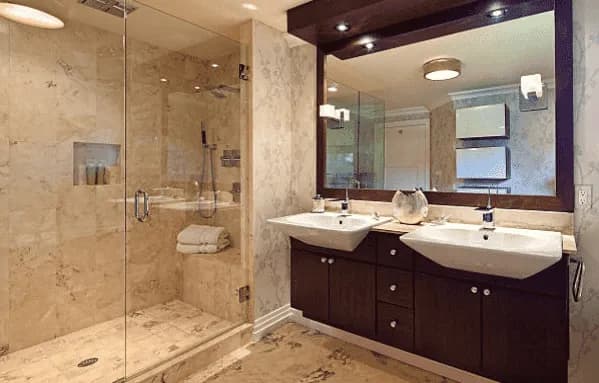
Things to Keep in Mind When Installing a Bathroom Vanity
Installing Between Walls and Cabinets
Even the most seasoned natural stone installers are cautious when they find out that they're delivering a vanity on a cabinet between two walls or finished panels. Since the piece is made to fit the cabinet almost exactly, there will be very little space to play between the two panels or cabinets. This means that the installer must be incredibly careful when laying the piece down over the cabinet top. In these cases, the piece must always be measured before transporting it into the home, as should the space between the walls or cabinet panels. If these are at least 1/4 inch of clearance, then the piece can be safely carried in. To lay the piece down, one side should be propped flush against one wall or panel, and the installer on the other end must bring the piece down slowly until it meets the cabinet top, supporting the piece in the middle so that it does not crack from the pressure. Once the piece has safely made it down flat over the cabinet top, the installers are essentially in the clear.
Try the Sink Before Installing
Some installers make the mistake of thinking that the obstacles of the installation are over with once the piece has made it in the bathroom. However, the installation can be greatly disrupted if the sink proves to be too big or small for the countertop. There's nothing more tedious for an installer than to mix a batch of epoxy glue for a sink installation only to have to start all over again after making adjustments to the size of the sink's lip. To avoid this, it's best to simply test the sink out and see if all sides of the lip are covered equally. If they are, the installers are free to glue the sink.
See if Any Finishing Beads Are Needed
Most vanity installations require a bead or two of caulking before the job can be effectively wrapped. Normally, there will be a small but noticeable gap either on one side of the piece or both. These can be filled with a simple bead of either silicone or latex glue. Silicone glue is ideal for the side of the countertop that presses up against a cabinet panel, while paintable white latex is perfect for filling in the seam between the countertop piece and a wall. Thankfully, it doesn't take a kitchen design expert to know how to fill in a bead of caulking; go slowly and smoothly, use a painter's tape if necessary, and remove the glue with the edge of the finger bit by bit.
$1000 Off Your Project!
Ask Us About Financing
Including 12 Months No Interest/No Payments
Recent Posts
Remodeling any area of the home is a huge undertaking. However, planning and executing a kitchen remodel requires a great many decisions to be made, can take weeks, and has additional impact on a family...
Updating the cabinetry in your home is a significant investment, so you should take your time and carefully consider your options. You want your choices to not only reflect your own specific needs and preferences...
Home Solutions by Kurtis is a sister company to Kurtis Kitchen & Bath—a renowned, family-owned and -operated remodeling company that Canton...
Reviews
From start to finish Kurtis was a great company to work with. From the initial contact and design concept with Gregory Holster to the cabinet drop off team, the install team led by project manager Jeff Tuomi and the countertop company, the project was on time and all work was performed beyond expectations. This was greatly appreciated seeing as it was completed on December 23. All the people involved were professional and did an excellent job.
Shanna was our project consultant. Picking out cabinets along with counters can be somewhat overwhelming but her knowledge & experience helped us make the right decisions. Dylan & Juwan unloaded truck & Dylan check off ship ticket to make sure all boxes were accounted for. Courteous & pleasant to talk to…nice job of stacking everything neatly in our garage. We couldn't be more pleased with the service & so happy with our kitchen
We recently worked with Lauren on cabinetry for a master bathroom renovation. She was great to work on the design and selections. Lauren was efficient and responsive from cabinet selection through ordering. Our overall installation was smooth. We had some unforeseen circumstances impacting our ability to accept delivery of our cabinets on the initial agreed upon date. Kurtis was very accommodating in rescheduling delivery given our project challenges. We couldn't be happier with our cabinets for this project.
We had complete renovations to our kitchen and main bathroom. From start to finish, the design with Shanna was exactly what we asked for and Jeff stayed on top of the renovations, communicating each step of the way. Every worker was professional and the final product is elegant and functional. We were very happy with Kurtis and would choose Shanna and Jeff again.
We love our new kitchen! Kurtis Kitchen & Bath did an outstanding job, and Adrian at the Clarkston location was exceptional to work with—creative, patient, and really listened to what we wanted. The project was well-organized, and we went from demo to a fully functioning kitchen in just 30 days. Highly recommend!


Like your current kitchen layout but want a faster update?
Please visit our sister company, ReNewIt By Kurtis, to learn about cabinet refacing!
Contact Us

MON-THURS: 10AM – 5PM*
FRI: Closed
SAT: 10AM – 2PM
SUN: Closed
*Evenings by appointment only
MON-FRI: 10AM – 5PM*
SAT: 10AM – 2PM
SUN: Closed
*Evenings by appointment only
MON-FRI: 10AM – 5PM*
SAT: 10AM – 2PM
SUN: Closed
*Evenings by appointment only
MON-FRI: 10AM – 5PM*
SAT: 10AM – 2PM
SUN: Closed
*Evenings by appointment only